Replacing Cable Lead Components
Product Support and Customer Service
For Further support visit our Contact Page
General
Think and act in a safe manner. Always disconnect power and use a lockout before you work on the E-coat system, or any of the related subsystems. Observe any confined space conditions. Use the appropriate safety equipment and clothing for the task. Please carefully read all the instructions listed below to familiarize yourself with the project before attempting to perform any of the work.
Required Materials
- Refer to the chart on back
Required Tools
- Wire Cutter
- Wire Stripper
- Soldering Gun
- Solder
General
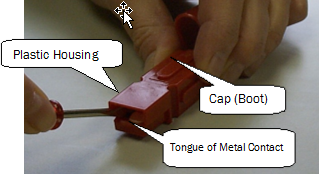
Cable Leads typically have a quick-connect feature. The Cable Lead has two parts. The part of the Cable Lead attached to the Electrode is called the “Pigtail” and is usually about 150 mm (6 in) long. In some instances (i.e. ME Roof Cells or ME Floor Cells) it can be longer. The other portion of the Cable Lead is called the “Long Half” and is usually about 1.5 m (5 ft) long. However, it can be longer or in some cases shorter, if a diode is included. The Long Half is connected to th bus bar. The Quick Connect is a high quality device that has two identical halves. Each half is composed of a silver plated copper contact that is crimped (at the factory or field soldered/crimped) to a wire, which is then inserted into a Plastic Housing. To protect the Plastic Housing, a PVC Drip Cap (or Boot) is included. The Drip Cap has two parts that slide into each other forming a protective shield. The Inner Cap is installed on the Pigtail and the Outer Cap is installed on the Long Half.
Replacing Plastic Housing
Step 1
Pull the Caps (Boots) apart. Remove the damaged plastic housing. Use a small flat blade screwdriver or xacto knife and press down on the spring underneath the tongue of the metal clip. (See photo below.)
Step 2
Inspect the Metal Contact’s connection to its cable. Repair or replace as necessary. Make sure that the appropriate Cap is already in place. Push the Metal Contact into the Plastic Housing until you hear a “click.” (See photo below) NOTE: The groove on the bottom edge of the tongue of the Metal Contact should pass over the spring clip in the other end of the Plastic Housing.
Step 3
Tug on the wire to make sure it has a tight connection and is fully inserted over the spring clip.
Replacing Metal Contact
Step 1
Locate the Metal Contact that will be replaced and cut the wire as close to the original Metal Contact as possible.
Step 2
Strip off the insulation of the wire:
| Capacity | Strip Amount |
| 25/30 | 8 mm |
| 45/75 | 14 mm |
| 120/180 | 25 mm |
Step 3
The factory uses a special four-sided crimp tool to attach the 25/30 and the 45/75 amp Metal Contacts. Put the stripped end of the wire into the Metal Contact and carefully solder in place. No solder can be on the exterior of the Metal Contact.
Step 4
For the 120/180 amp version, the factory places one crimp using the “G-2” setting of a Thomas & Betts crimp tool. For the “G-2” setting, place the Metal Contact and rotate it so the nose of the crimp is on the same face as the “A” that is stamped on the tongue of the Metal Contact.
Step 5
In most cases you will want to use a new Plastic Housing. See the section above for help in inserting the Metal Contact into the Plastic Housing.
Replacing Drip Caps (Boots)
Step 1
If a Drip Cap must be replaced, then generally the Plastic Housing must be removed first. See the first section for instructions on how to remove the Plastic Housing.
Step 2
Push the replacement Drip Cap over the Metal Contact and wire so that the smaller opening is either pointing toward the Electrode or the bus bar.
Step 3
Replace the Plastic Housing. Refer back to the first section.
Reference Chart
Use the chart below to double-check the UFSc P/N for the components discussed above.
| Component Name | 25 & 30 Amp Cable Leads | 45 & 75 Amp Cable Leads w/AWG #6 | 120 Amp Cable Leads | 180 Amp Cable Leads |
| Use AWG # Size | #12 | #6 | #2 | #2 Welding Wire |
| Metal Contact | 250037 | 250024 | 250041 | 250085 |
| Plastic Housing | 250036 | 250035 | 250040 | 250084 |
| Inner Drip Cap (for Pigtail Lead) | 535008 | 535011 | 535013 | 535013 |
| Outer Drip Cap (for Long Half Lead) | 535009 | 535010 | 535012 | 535012 |
| Reducing Bushing for Metal Contact | n/a | n/a | n/a | n/a |
BULLETIN 993105

