Low Profile Disassembly and Re-Assembly
Product Support and Customer Service
For Further support visit our Contact Page
Safety
Think and act in a safe manner. Always disconnect power and use a lockout before you work on the E-coat system, or any of the related subsystems. Observe any confined space conditions. Use the appropriate safety equipment and clothing for the task. Please carefully read all the instructions listed below to familiarize yourself with the project before attempting to perform any of the work.
Required Materials
- None
Required Tools
- Pipe vise with jaw protectors
- Sawhorse
- Strap Wrenches (or Pipe Wrenches)
- Tape Measure
Disassembly
- Measure and record overall length of Cell from bottom of cap to top of hose barb connections on top of Bulkhead Fitting. (This is an important step for re-assembly.)
- Use vise to secure TECTRON Cell at end of collar nearest top of Cell; lower half of collar will not support pressure of vise. (See Fig. 1.) Support bottom end of Cell with sawhorse.

- Adjust one wrench to fit compression nut turning clockwise (as viewed from top of cell).
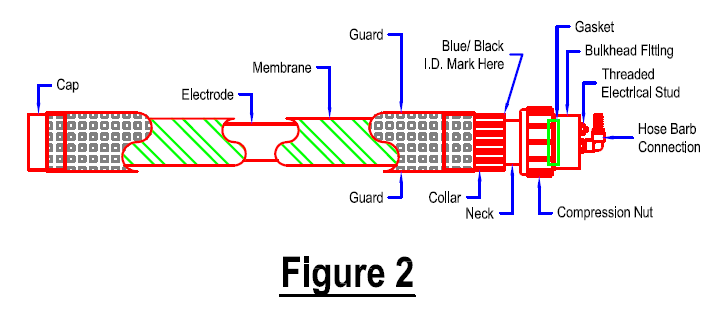
- Adjust second wrench on body of Bulkhead Fitting (See Fig. 2.) turning opposite of Step 3.
- Loosen compression nut with wrench while holding the Bulkhead Fitting steady.
- After several turns, wrenches can be removed and set aside. Compression nut can be removed by hand if Bulkhead Fitting is kept steady with the other hand.
- Leaving rubber gasket and compression nut on the neck, remove Bulkhead Fitting/Anode assembly from the Membrane Shell.
- Rinse paint from Anode with D.I. Water hose (both inside and out). This step is necessary only if the Shell was damaged.
NOTE: In the case of RuO/IRO Anodes, black surface must be protected from scratching or any other damage. Arrange a non-abrasive cushion that will allow storage with no accidental contact between Anodes, or with tools, etc. Handle with great care when carrying or transporting RuO/IRO Anodes from place to place.
Re-assembly
- Align Shell in pipe vise at top third of collar (see fig. 1) so that blue/black ID mark faces up on seam of membrane shell. Tighten securely but do not crush PVC pipe/collar.
- Slip compression nut along neck to the collar. Place one layer of Teflon tape on threads of Bulkhead Fitting.
- Moisten one edge of rubber gasket (PN 390006) with a couple drops of liquid soap. Place this edge toward compression nut and slip gasket over neck. Top of gasket should be about ¾" from top of neck.
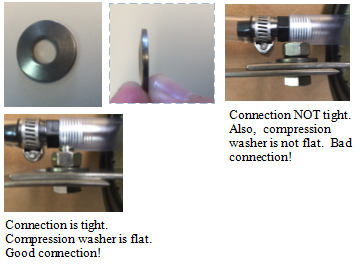
- Tighten Bulkhead to Anode tab with 5/16” hardware set provided or inspect if assembled already. This connection must be tight and the compression washer must be flat. If this connection is not tight, it will become loose and create an arching effect that will destroy the Anode tab and Bulkhead tab
- Insert Bulkhead Fitting/Anode assembly into Shell and keep threaded electrical stud facing up, aligned with the black ID mark.
- Shake and twist Anode slightly while pushing forward to engage it in the bottom of PVC cap at other end.
- Pull gasket forward and be sure it fits uniformly under lip of Bulkhead Fitting threads.
- Start compression nut by hand for one turn. Now measure entire length of Cell, from bottom of cap to top of hose fittings in Bulkhead Fitting. Compare this length to the length noted in # 1 of the disassembly instructions. If dimension is longer, you must re-seat Anode into cap's center "well". Re-check.
- Tighten compression nut by hand, keeping threaded stud on Bulkhead Fitting aligned with blue/black ID mark. Tighten last few threads with wrench until one thread or less is exposed. DO NOT over-tighten this connection.
NOTE: Be sure threaded stud is still aligned with ID mark on collar and total Cell length is no longer than before.
BULLETIN 990133