Bracket for Rocker Panel Cells
Safety
Think and act in a safe manner. Always disconnect power and use a lockout before you work on the E-coat system, or any of the related subsystems. Observe any confined space conditions. Use the appropriate safety equipment and clothing for the task. Please carefully read all the instructions listed below to familiarize yourself with the project before attempting to perform any of the work.
Required Materias
- Bracket PN 187051
Required Tools
- 3/16” Allen Wrench
- Band Saw or equivalent
- Sander
Step 1
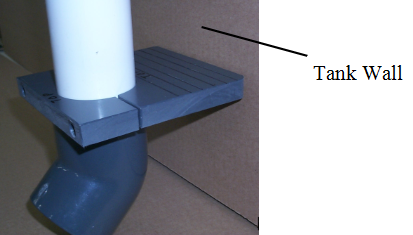
Attach the bracket to the neck of cell using a 3/16” allen wrench. Use the 45 degree elbow as a ledge to keep bracket level. Use match marks 1 and 1, 2 and 2 etc (Like numbers are sets). Place bracket so that the bigger face is facing the tank wall.

Step 2
Lower cell with bracket down into the paint tank to check to see how much of the bracket needs to be cut off. To get the cut off dimension, simply measure the distance between the plumb neck and the tank wall. Cut an additional 1/2” off, this will help the cell from swaying back and fourth. Once cut has been made these brackets can be reused as long as it is placed in the same location. Note: Once cut has been made make sure to round off corners.
Step 3
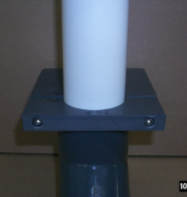
Place bracket back on cell and be careful not to over tighten. The bracket comes with Lock Washers. Fasten cell as required.
These brackets are reusable! This type of bracket makes it easy for when the cell needs to be replaced, simply take bracket off and place on new cell.