Bare Roof Electrode
Product Support and Customer Service
For Further support visit our Contact Page
Safety
Think and act in a safe manner. Always disconnect power and use a lockout before you work on the E-coat system, or any of the related subsystems. Observe any confined space conditions. Use the appropriate safety equipment and clothing for the task. Please carefully read all the instructions listed below to familiarize yourself with the project before attempting to perform any of the work.
Required Materials
- 2” 2 pc. stainless steel clamps
Required Tools
- Crescent Wrench
General
Always disconnect power and use a lockout before you work on the E-coat system or any of the related subsystems. Observe any confined space conditions. Use the appropriate safety equipment and clothing for the task. These instructions apply for those TECTRON Roof Cells that have vertical PVC legs on either end and are attached to the inside of the tank.
Step 1
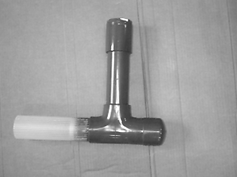
Remove bare electrodes from box and/or crate.
Step 2
Submerge bare roof cells no less than 6” from the top of paint level and attach neck with stainless steel (suggested so as to reduce paint contamination) clamps to side of electrocoating tank.
Step 3
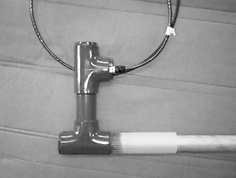
Connect electrical connection (pigtail) from neck of roof cell to DC power source (busbar, long half, etc.).
Note: For adjustable leg models on bare roof assemblies (example: 724003) attach tank support to 1” diameter adjustable leg and also the permanently glued leg of bare roof cell. (See picture below)
Step 4
Set overall length to desired dimension by using the adjustable leg of the assembly to slide in and out for specified distance. (See picture below)
BULLETIN 993143